AN ARTICLE CONCERNING CARTOONY CLOTH
Sometimes cloth simulation is not the best solution, especially when it comes to minimally designed characters, and ‘poppy’ animation, which entails variation between slow and fast movements (i.e. your character covers a large distance in a short duration of time). The following article shows my own struggles to create a consistent, smooth look to a simple dress, which turned out to be not-so-simple.
SYFLEX
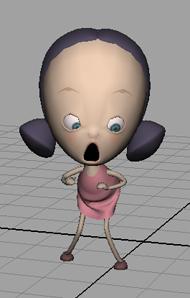
My character, Lucy, looks basically like this:

I had no prior experience with cloth simulation, but I learned a lot about SyFlex, and I thought, “How hard can it be? It’s just a simple dress, I’ll just create a piece of cloth and simulate it. It would probably work with default settings, right?”
Wrong!
After a few tries with SyFlex, it was clear this was not the look I was going for. Once you introduce collisions, you create a lot of problems for yourself, especially if your character has skinny arms and legs, and you want to cover them – partially or fully – with a much larger piece of cloth. Once I saw the first results, I was completely disillusioned. As soon as my character made her first full ‘take’, the legs completely penetrated the dress and went through the other side of it, locking it into the leg geometry.
And there was no way around it too. Any setting created different problems: If the dress was too rigid, it couldn’t bend enough to compensate for the acute angle between the legs and the body. If it was too flexible, it flopped around too much, and extreme movement completely ‘broke’ the geometry. If the collision envelope for the legs was too small, the dress, again under extreme situations, would penetrate the legs and lock itself in the geometry. And if the envelope was too large, the dress would collide too early and wouldn’t even cover the girl’s panties. A 4 year old with a distorted, ripped looking mini skirt is simply wrong… Moreover, you can’t have a character as simple as this, with a dress that looks like this:

Instead on focusing on the girl’s facial expressions and body language, the eye is immediately drawn to the one spot that looks different. And in this case, the wrinkles not only create a very detailed and disorganized pattern, it also came to the point where the dress didn’t even look like a dress anymore. It looked more like, I don’t even know, like a screwed up accordion or something. And all I wanted was this:

MAYA HAIR CURVES
What I like about maya’s built in hair system, is a little attribute called ‘start curve attract’, which basically gives the dynamic curve the ‘desire’ to return to its default position. It’s great, cause, unlike Syflex, no matter how extreme your character gets, once it’s back into a relatively normal pose, the dress would get back to its modeled form, but would still have nice overlapping action, which was really important to me. I mean, what’s a cartoon without overlapping action? Can you imagine all the hair and the squishy materials in my scene squashing, stretching and overlapping, but the dress stays completely rigid? The lack of movement would – like in the case of the wrinkles - draw the eye right to it, where in fact this puny little dress is the most insignificant object in the entire scene!
So I decided to bid SyFlex farewell, and completely re-rig my dress, orienting it towards maya’s dynamics (hair curves). I decided to treat the dress as two separate parts: the top, which would be rigged to deform exactly like the top of her body, and the bottom, which would have all the dynamics. The top was easy as expected, and I even got extra lazy, and instead of binding it to the spine (and spend extra time on weighting), I created a few rivets on the body, parented some joints to them, and bound the top of the dress to those. Rivet.mel can be easily found online – it makes you pick 2 edges, and creates a locator between them that is essentially bound to the geometry, no matter how it deforms – exactly like hair follicles. Come to think of it, I’m not even sure if I used rivets or follicles, because they do the same thing.
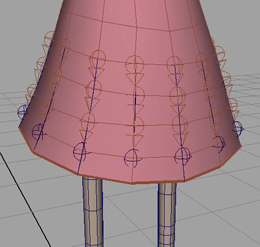
On any case, I knew the bottom is the real challenge. I spend at least half a session to create the following setup:

I created joint chains all around the dress – every vertex has a joint that’s snapped to it. I made each of the chains spline IK – with autocreate curve turned on – and then deleted the IK’s, so that all that was left were the curves. Next I parented these base curves, as well as the main chain joints to one of the spine joints. Following which, I made these curves dynamic, and anchored the follicles only at the ‘base’ (instead of the default ‘both ends’, because I wanted the bottom to flop around). Next, again, I made each of the chains spine IK, but this time I turned ‘auto create curve’ off, and picked the corresponding dynamic curve for each of the chains. Finally, I bound the bottom of the dress to the joint chains. For accuracy’s sake, I must note I did not bind the geometry to the top and then the bottom (I think it’s impossible right?), but once the whole rig was completed, I picked all the joints I needed (including the top riveted joints, and the bottom joint chains) and bound everything together.
As for the hairSystem, as you’ll see next, the settings I put in it are not relevant at this point, cause the whole thing didn’t work. I remember I was going for a very high rigidness setting, and, of course, my beloved ‘start curve attract’ cranked up to around 0.3. Now as for the legs going through the dress, I knew I needed collisions, so I made one collision sphere to each of the legs (faster computation than actually making the geo collide), and one for the body. I was so eager to test it I skipped lunch, and immediately loaded up my scene, biting my fingernails with anticipation as it simulated.
It soon became clear that I failed horribly. Granted, there were no more wrinkles, and the dress actually moved exactly like I wanted it to, but as for the collisions, how should I put it, they were nonexistent.
The problem was, that because the dynamic curves went down the dress, but were not connected horizontally, they would just slide-off the colliding sphere on either side. Moreover, if Lucy had to split her legs (running, bending, whatever), there were a few situations where the legs appeared as if they were coming out of her belly, and the dress is tagging along between them. Not cool.
Oh well, back to the drawing board. What should I do to make the dress collide with the legs, under any circumstances?
THE NIGHTMARE BEGINS
My frustration started to build up during the next few days of work, as my futile attempts to make the collisions work became increasingly frustrating. Firstly, I tried to go around the problem – if the vertical chains slide off the collider-spheres, horizontal chains seemed the obvious solution. Trust me, don’t ever, ever, try to use layered horizontal loops to simulate cloth. You can only begin to imagine the mess it created during simulations. Loops breaking apart, jumping frantically, and even shooting up to infinity at some point, as if maya was telling me, ‘come on man. I mean -- come on…”
Horizontal loops not only didn’t solve the collisions issue, it made the simulation worse. I reverted back to an older save, and took another look at the vertical setup. I wished I could have had the same simulation quality from this kind of setup, but somehow connect the chains horizontally too. So, in the next attempt, I tried to combine both ideas: the vertical chains are not skinned to the dress, but instead, they are skinned to the horizontal curves, which are also dynamic. Can you imagine the mess? 2 hair systems, 20 follicles and a gazillion joints made up for a true rigging jungle, filled with wild animals and buzzing insects, all created to make a tiny piece of cloth wrap around a stick figure.
Needless to say, that totally didn’t work either. If it’s too complicated, it’s probably not the best solution. I can’t even begin to describe the horrendous, albeit quite fascinating, results of this Frankenstein experiment. No, the solution has to be simpler.
The following night, as I lay awake in my bed, beating myself up for getting into this hopeless situation, it finally hit me: “Not verticals, not horizontals -- ….DIAGONALS! It’s genius,” I thought, and fell asleep soundly. The next day I leaped out of my bed with a victory roar, and immediately began the vigorous rigging session, which entailed re-creating all the joints and dynamics in a counter-clock-wise looping diagonals configuration. A few hours later I was done. Wiping the sweat off my forehead, I sat back to observe this thing of beauty. Thoughts started running through me head, “This is ingenious! You should patent this, you’ll make millions marketing this thing! You’ll start an empire, just like Bill Gates!”
Needless to say, this setup was also an utter failure.
Just as I was about to give up completely and make my girl wear little pants, I realized what was the basic mistake that I kept making. It’s the collisions. It’s impossible to simulate collisions on cartoony characters without spending weeks and weeks on tweaking each and every frame. Period. If I could find a solution that goes around the whole collision thing, but still keeps the legs from penetrating, not only will it work, the computation would be a lot faster.
LIGHT AT THE END OF THE TUNNEL
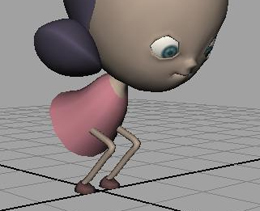
The main problem was getting the general shape of the dress to fit the body and the legs, even in cases where Lucy bends to the extreme. If I simply parented the joint chains to the spine, when she bends it looked something like this:

What I did was, I created a little controller between her legs. The controller is parented to BOTH legs (0.5 weight on each), so it’s always exactly in the middle, no matter how far apart they are from each other. Inside this controller, parented to it, there’s a little joint. Then I’ve built a curve coming out of this joint, and going to one of the middle spine joints. I smooth bound this curve (with about, oh, 5 or 6 curve points) to the little joint between the legs and the spine joint, and messed around with the weighting, so it always looks like a nice smooth curve, no matter how much she bends. I’ve built a chain joint of about 3 or 4, and made it spline IK with the curve. This chain of joints was skinned to all the follicles I already had (remember?). And voilla.

What this does is no matter where the legs are in relation to the body, the dress would always ‘try’ to be somewhere in the middle. The simulation is very rigid, and it works on top of that. i.e. first the base curves get their shape, and then the dynamic curves are simulated. Testing it showed that although it doesn’t work perfectly, it does exactly what I want it to do, and it’s definitely something to work with.
By the way, and this is not so by the way at all, the controller between the legs can be animated, to offset the position of the bottom of the dress. Very useful. Although you need to go in and animate it, it takes about two hours for a 1400 frame shot, which is way faster than any kind of simulation.
FINALIZING THE RIG
After I did my best to make the dress look good in my scene, I noticed it needs just a few more things. First of all, remember the little curve coming from the controller to the spine? Remember the spline IK built on top of it? It wasn’t twisting with the body. I had to connect the controller rotate Y attribute to the IK’s twist attribute, which means I had to animate the twist as well. I’m sure I could have automated this, but at this point, I don’t think it’s necessary anymore.
Secondly, I needed another layer of control just for those specific frames that are extra problematic, or for movements where the dress is the main focus (when she spins around for example, and I want it to flap around her body with nice waves), I needed the ability to ‘sculpt’ the dress, and I needed those ‘sculpting controls’ to be animatable, and resetable. I duplicated the dress’s Geo and freeze transformed it. I built a proxy model around it with very few points, and wrap-deformed it around the first model. I created a joint for every vertex of the proxy, each parented to a controller. Finally I made this ‘custom dress’ a blendshape for the original dress, BUT, the deformation order is critical: I want the dress first to be distorted, and only then bound to the dynamic system, which means the blendshape has to come before the skin. So in deformation-order I put ‘top of chain’.

That’s it. This second layer of control was a lot of work to animate, but it gave me that special ‘umph’ for specific segments of animation, and it finally drove a final blow to the penetrations, eliminating them completely.
FINAL WORD
I hope this has been a little helpful to all you animators/riggers out there, and that you’ll learn from my mistakes – keep it simple, keep it clean, and try to avoid collisions.


